Friday, November 29, 2013

019. iReport: CREATE NEW REPORT


We have to read and understand 013. SETTING DATABASE CONNECTION.
This tutorial using iReport 4.1.1.


  1. Create New File...
  2. Set Report Name (example: rptDDA)
  3. We will see a dialog that we have created it.
  4. Click Query Button
  5. Unceklis Automatically Retrieve Fields


  6. Write this sql:
    SELECT C.* FROM SCH.CHILD C
  7. Click Read Fields button. The fields will be shown below.
  8. Click OK
  9. All of Fields will be shown in Report Inspector tab -> Fields node.
  10. Select all fields, then drag them to Detail band.
  11. Fit the Detail height, by double click the bottom line of Detail band.
  12. Select all object within Detail band and Column Header band.
  13. Right click them, select Padding and Borders.
  14. Set the Line width, then OK.
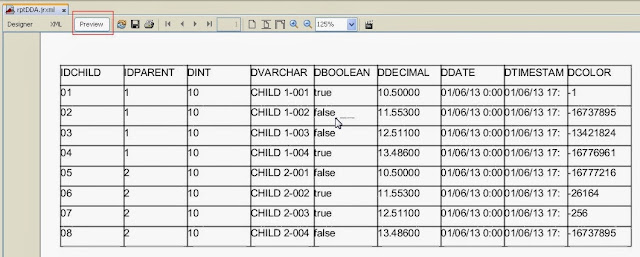
  15. Click Preview button.
We know, it doesn't look like an interesting report. Remember, these steps are for white-belt.


Tuesday, November 19, 2013

MISC: SETTING HUAWEI (CE 0682 - E220) MODEM IN UBUNTU 10.04

Setting
  1. Plug modem
  2. Edit Connection
  3. Choose country (ex. Indonesia)
  4. Choose I can't Find Provider
  5. Set Provider (example: 3)
  6. Choose My Plan isnot listed
  7. APN = 3gprs
  8. Number = *99#
  9. User = 3gprs, Password=3gprs
  10. Check Connect Auto
  11. Check Available to All user

To establish connection
  1. Plug modem
  2. Wait until modem being detected
  3. In Terminal, type: sudo eject /dev/sr1
  4. Restart Computer (not shutdown)
  5. Connection is ready.
I hope it work.

Thursday, November 7, 2013

018. JAVADB-DERBY: CREATE PROCEDURE (PART 2)

  • Previously, create .jar file. Example:

    package procedure;


    public class procfortrigger {
     
         public static void procInOut(String prm, long[] result){
            try{
                Connection conn = DriverManager.getConnection("jdbc:default:connection");
                Statement st=conn.createStatement(ResultSet.TYPE_FORWARD_ONLY,
                        ResultSet.CONCUR_READ_ONLY);

                String strSQL="SELECT VAL FROM MYSCHEMA.MYTABLE "
                        + "WHERE LOWER(MYFIELD)='" + prm.toLowerCase() + "'";
                ResultSet rs=st.executeQuery(strSQL);

                long val=0L;
                long addVal = val + 1;

                if(rs.next()) {
                    val=rs.getLong(1);
                    addVal = val + 1;
                    String updVal="UPDATE MYSCHEMA.MYTABLE SET VAL=" + addVal
                        + " WHERE LOWER(MYFIELD)='" + prm.toLowerCase() + "'";
                    conn.prepareStatement(updVal).execute();

                } else {
                    String insSeq="INSERT INTO MYSCHEMA.MYTABLE (MYFIELD, VAL) VALUES ('"
                            + prm.toLowerCase() + "', "
                            + addVal + ")";
                    conn.prepareStatement(insSeq).execute();
                }
                rs.close();
                st.close();
                rs=null;
                st=null;

                conn.close();
                conn=null;
               
                result[0] = addVal;
               
            }catch (Exception ex){
                result[0]=0;
            }
        }


    }

    Compile to .jar file (example: DDA_derby.jar).


  • Create procedure:
    CREATE PROCEDURE APP.PROCINOUT(IN PRM1 VARCHAR(200), OUT RESULT BIGINT)
    PARAMETER STYLE JAVA
    MODIFIES SQL DATA
    LANGUAGE JAVA
    EXTERNAL NAME 'procedure.
    procfortrigger.procInOut';

    GRANT EXECUTE ON PROCEDURE APP.PROCINOUT TO other_user;

Test:
    public long intSeq(Connection dnCon, String dnSeqName){
        try{
            CallableStatement cs = dnCon.prepareCall("{call APP.PROCINOUT(?,?)}");
            cs.setString(1, dnSeqName);
            cs.registerOutParameter(2, Types.BIGINT);
            cs.execute();

            long num_ = cs.getLong(2);
            cs.close();
            cs=null;

            return num_;

        }catch (Exception ex){
            System.out.println("err-" + dnSeqName + ": " + ex);
            return 0L;
        }
    }


Tired? Confuse? May be we would better drink a glass of coffee. Just for refreshing...

017. JAVADB-DERBY: CREATE TRIGGER

 Assume: We have read and understood JAVADB-DERBY: CREATE PROCEDURE


  • Create trigger after insert:
    CREATE TRIGGER APP.TRG_AFTERINS
    AFTER INSERT ON MYSCHEMA.MYOTHERTABLE
    REFERENCING NEW AS NEW
    FOR EACH ROW
    CALL APP.APROCFORTRIGGER_AFTERINS(CAST (NEW.OTHERFIELD1  AS VARCHAR(20),
         CAST (NEW.OTHERFIELD2  AS VARCHAR(20));

  • Create trigger after update:
    CREATE TRIGGER APP.TRG_AFTERUPD
    AFTER UPDATE ON MYSCHEMA.MYOTHERTABLE
    REFERENCING OLD AS OLD NEW AS NEW
    FOR EACH ROW
    CALL APP.APROCFORTRIGGER_AFTERINS(CAST (NEW.OTHERFIELD1  AS VARCHAR(20),
         CAST (OLD.OTHERFIELD2  AS VARCHAR(20));

  • Create trigger after delete:
    CREATE TRIGGER APP.TRG_AFTERDEL
    AFTER DELETE ON MYSCHEMA.MYTABLE
    REFERENCING OLD AS OLD
    FOR EACH ROW
    DELETE FROM MYSCHEMA.MYOTHERTABLE WHERE OTHERFIELD1=OLD.MYFIELD1 AND OTHERFIELD2=OLD.MYFIELD2;


Do you really want to try?

016. JAVADB-DERBY: CREATE PROCEDURE (PART 1)

  Trust me, it is still complicated. But, it's cool.


  • Previously, create .jar file. Example:

    package procedure;


    public class procfortrigger {
     
         public static void aprocfortrigger_afterins(String prm1, String prm2){
            String sql="INSERT INTO MYSCHEMA.MYTABLE (MYFIELD1, MYFIELD2) "
                    + "VALUES('" + prm1
                    + "', '" + prm2
                    + "')";

            try{
                Connection conn = DriverManager.getConnection("jdbc:default:connection");
                conn.prepareStatement(sql).execute();

            }catch (Exception ex){
                System.out.println("err: " + ex);
            }
        }

    }

    Compile to .jar file (example: DDA_derby.jar).

  • Register that .jar to Derby:
    Using Derby GUI, run query:
    CALL sqlj.install_jar ('C:/myfolder/DDA_derby.jar', 'APP.DDA_derby', 0);

  • Create classpath:
    CALL SYSCS_UTIL.SYSCS_SET_DATABASE_PROPERTY('derby.database.classpath', 'APP.DDA_derby');

  • Create procedure:
    CREATE PROCEDURE APP.APROCFORTRIGGER_AFTERINS(
            IN PRM1 VARCHAR(10), IN PRM2 CHAR(10))
    PARAMETER STYLE JAVA
    MODIFIES SQL DATA
    LANGUAGE JAVA
    EXTERNAL NAME 'procedure.
    procfortrigger.aprocfortrigger_afterins';

Deleting .jar:
CALL sqlj.remove_jar ('APP.DDA_derby', 0);

Replacing .jar:
CALL sqlj.replace_jar('C:/myfolder/DDA_derby.jar', 'APP.DDA_derby');


Test:
CALL APP.APROCFORTRIGGER_AFTERINS('123', 'DANIANI');


Do you still want to try?

Saturday, October 26, 2013

015. JAVADB-DERBY: CREATE FUNCTION

Trust me, it is complicated. But, it's cool.


  • Previously, create .jar file. Example:

    package function;


    public class parameters {
         private static String stcPrm1="";

         public static String setPrm1(String dnString){
            stcPrm1=dnString;
            return stcPrm1;
         }

         public static String getPrm1(){return stcPrm1;}
    }

    Compile to .jar file (example: DDA_derby.jar).

  • Register that .jar to Derby:
    Using Derby GUI, run query:
    CALL sqlj.install_jar ('C:/myfolder/DDA_derby.jar', 'APP.DDA_derby', 0);

  • Set classpath:
    CALL SYSCS_UTIL.SYSCS_SET_DATABASE_PROPERTY(
    'derby.database.classpath', 'APP.DDA_derby');


  • Create function:
    CREATE FUNCTION APP.SETPARAM1(PARAM1 VARCHAR(200))
    RETURNS VARCHAR(200)
    PARAMETER STYLE JAVA
    NO SQL LANGUAGE JAVA
    EXTERNAL NAME 'function.parameters.setPrm1';

    CREATE FUNCTION APP.GETPARAM1()
    RETURNS VARCHAR(200)
    PARAMETER STYLE JAVA
    NO SQL LANGUAGE JAVA
    EXTERNAL NAME 'function.parameters.getPrm1';

Deleting .jar:
CALL sqlj.remove_jar ('APP.DDA_derby', 0);

Replacing .jar:
CALL sqlj.replace_jar('C:/myfolder/DDA_derby.jar', 'APP.DDA_derby');


Test:
SELECT * FROM MYSCHEMA.MYTABLE WHERE MYFIELD=APP.SETPARAM1('ABCDE');


Parameterize View:
CREATE VIEW VW AS SELECT * FROM MYSCHEMA.MYTABLE WHERE MYFIELD=APP.GETPARAM1();

SELECT VW.*, (VALUES APP.SETPARAM1('ABCDE')) FROM VW;


Do you want to try?

Saturday, October 12, 2013

014. JAVADB-DERBY: GUI


These are the reasons why I am choosing JavaDB-Derby database:
  1. Multiplatform and free.
  2. Without database installation.
  3. It can be an embedded database, like as Ms. Access. Just copy-paste a database folder for backup.
  4. Support relationship.
  5. It has view and sequence.
  6. It has function, procedure, and trigger. Trust me, they 're hard.
  7. It can be attached a custom function from .jar. So, it can show a form/frame from .jar with SQL sintax.
  8. Autonumber datatype can be restart to number 1.
  9. It has BOOLEAN datatype.
  10. It has database security.
  11. Easily upsize to be a server database. Just moving that database folder to derbyhome/bin folder. Then run StartNetworkServer.bat or StartNetworkServer.sh. And easily downsize to be an embedded database.
  12. It can be stored in .jar file. Though there are a few limitation, like as: data can't be added, editted, or deleted; No database security; Using APP schema only.

This GUI using derby.jar version 10.8.1.2. If it is different from your version, replace it with your derby.jar and your derbyclient.jar.

We can download a simple "JAVADB-DERBY GUI" from this link, or from top-right corner of this page. On GoogleDrive page, choose menu: File -> Download.

We can read Derby reference from http://db.apache.org/derby/docs/10.2/ref
For example we can read 008. ADD DATABASE TO JTABLE (PART 1).

Thanks a lot, to Apache Derby (Apache Software Foundation), and to all.


Thursday, October 3, 2013

013. iReport: SETTING DATABASE CONNECTION

Requirements:
- download derby.jar (database library).
- download sample database (Java DB - Apache Derby 10.8.1.2)On GoogleDrive page, choose menu: File -> Download. This file contain database=DANIANI_DB; user=daniani_user; password=daniani_pwd; schema=SCH. Then extract it in a certain location.

  1. Run i-Report application
  2. Click menu Window - Services


  3. Right click Drivers node, select New Driver...


  4. Click Add button, then search derby.jar.

  5. We 'll see there is a new driver, then right click, select Connect Using...
  6. Search the Derby database location, for example (case-sensitive) database name = DANIANI_DB, user = daniani_user, password = daniani_pwd


  7. On tab Advanced, select schema to SCH (my schema).


  8. The connection has been built. Double click the connection then rightclick PARENT table, choose view data ...


  9. On toolbar click Datasource button.


  10. Choose Netbeans Database JDBC connection


  11. set Name = whatever (example: DDA), and choose Connection.


  12. We 'll see, then Close.


  13. The datasource 'll be shown. This step for our next discussion about i-Report.


Wednesday, July 17, 2013

012. FILTER (JTABLE PART 3)


Requirements (we have read):
- re-download daniani.jar (for newer version)
- 008. Add Database to JTable (JTable Part 1)
- 006. Container: JSplitPane by Netbeans

  1. Open a project that we have made in 008. Add Database to JTable (JTable Part 1) and do a modification.
  2. Add container JSplitpane.
  3. Set orientation property = VERTICAL SPLIT
  4. Set dividerLocation = 30
  5. Add container JPanel, and  put on Top JSplitpane.
  6. Set JPanel layout = Box Layout
  7. Move table to Bottom JSplitpane.
    If TopSplitpane disappear, then resize the dividerLocation, for example to 31.
  8. Add JTextField (have to) to JPanel, named=txSearch, set horizontalAlignment = CENTER, set Text property to be empty.
  9. Add JLabel (optional) named=lbRowCount, and put on the right of JTextField. set horizontalAlignment = CENTER, maximumSize = [50, 30], minimumSize = [50, 30], preferredSize = [50, 30]
  10. The design will look like:
  11. Go to source code, and add script below dtble.buildtable(...) :
    dtble.tableFilter(txSearch, lbRowCount);
    We can set null for JLabel, example: dtble.tableFilter(txSearch, null);
  12. Try it by type some character in txSearch. It will filter for all column.
  13. What about filtering per-column?
    Just click the button inside txSearch.
  14. Click a row on certain column, then right click.
  15. Try to add criteria by click on the other column, then right click.
  16. To display the criteria that we have made, doubleclick the txSearch.
  17. Click the button to switch to all column mode.
Note:
For boolean class-type, we can set criteria = true or false

I hope it work..

Saturday, June 29, 2013

011. JTABLE POPUP (LIKE AS JCOMBOBOX)


Sometimes, we need Combobox more complicated. So, I build it with some helps.


Requirements (we have read):
- 010. Add Component (Control) to Palette.

  • Create new JFrame, named comboTable.
  • Drag dnComboBox control (component),  named cb.


  •  Drag the other controls, for example: JTextField = tx, JFormattedTextField = ft, JSlider = sld, JCheckbox = cb, JLabel = lb. Then design it, like as below:
  • Edit the source code:
    public comboTable() {
            initComponents();

            try{
                Connection dCon=null;
                Class.forName("org.apache.derby.jdbc.EmbeddedDriver");
                dCon = DriverManager.getConnection("jdbc:derby:"
                        + "E:/DKARTZK/WEB/14netbeaner/DANIANI_DB"
                        + ";user=daniani_user;password=daniani_pwd");

                cb.initColumn();

                cb.addColumn("PRT.IDPARENT","idparent", false, "text", 40, "");
                cb.addColumn("PRT.DINT","dint", false, "number", 40, "");
                cb.addColumn("PRT.DVARCHAR","dvarchar", false, "text", 120, "");
                cb.addColumn("PRT.DBOOLEAN","dboolean", false, "yesno", 90, false);
                cb.addColumn("PRT.DDECIMAL","decimal", false, "numberBD2", 50, "");
                cb.addColumn("PRT.DDATE","date", false, "date", 100, "");
                cb.addColumn("PRT.DTIMESTAMP","timestamp", false, "timestamp", 150, "");
                cb.addColumn("PRT.DCOLOR","color", false, "color", 80, "");

                String sqlFrom="FROM SCH.PARENT PRT";

                cb.buildCombo(0, 2, sqlFrom, dCon);
                cb.setTabTitle("parent table");
                cb.setSizePopup(600, 5);

                //--render
                cb.cellFormatNumber(2, new String[]{"decimal"});
                cb.cellAlignment(SwingConstants.CENTER, new String[]{"idparent", "date", "timestamp"});
                cb.cellColoring(Color.GREEN, new String[]{"dvarchar"});

                JTable tbl=cb.getTable();
                tbl.setDefaultRenderer(Color.class, new daniani.ColorRenderer(true));
               
                //cb.setIndex(0);

                JTextField txCb=(JTextField) cb.getFormattedTextField();
                txCb.addFocusListener(new java.awt.event.FocusAdapter() {
                    public void focusLost(java.awt.event.FocusEvent evt) {
                        lb.setOpaque(true);
                        lb.setBackground((Color) cb.getSelectedCellValue("color"));
                        tx.setText(cb.getSelectedCellValue("dvarchar").toString());
                        ft.setValue(cb.getSelectedCellValue("decimal"));
                        sld.setValue((Integer) cb.getSelectedCellValue("dint"));
                        ck.setSelected((Boolean) cb.getSelectedCellValue("dboolean"));

                    }
                });

            } catch(Exception cnfe){
                System.out.println(cnfe);
            }
        }
  • Syntax:
    cb.buildCombo(int boundColumn, int viewColumn, String sqlFrom, Connection dnCon);
    boundColumn = column index that set as ID. So we can call: cb.getID();
    viewColumn = column index that will be shown on dnComboBox when row being selected.


    NOTE:
    For reference, we can read 008. Add Database to JTable (JTable Part 1). 

010. ADD COMPONENT (CONTROL) TO PALETTE

Requirements (we have read):
- 007. Register library, and download (or re-download for new version) daniani.jar.

  • On menu Tools, select Palette -> Swing/AWT Components
  • On Palette Manager, click Add from Library...
  • Choose daniani library (for example), then click Next >
  • On Install Components to Palette, choose dnComboBox, then click Next >
  • Choose palette category, select Swing Controls category. Click Finish.
  • dnComboBox will be shown on Palette Manager dialog. Click Close.
  • dnComboBox will be added to Palette tab.

Thursday, June 27, 2013

009. ADD ROW / REMOVE ROW (JTABLE PART 2)

 Requirements (we have read):
- 008. Add Database to JTable (JTable Part 1).

In this case, we are talking about my way.
We need to change script to be:
dtble.buildTable(tbl, true, sqlFrom, dCon, false);

And, the first column should be editable. For example:
dtble.addColumn("'' STATUS","status", true, "java.lang.String", "text", 70, "");

Then:
- to add row: type -dn- in first column
- to remove row: type -xx- in first column.

Perhaps:
- tbl.setValueAt("-dn-", rowIndex, 0);
- tbl.setValueAt("-xx-", rowIndex, 0);

Note:
This action doesn't affect the database. We need another action to do that. May be, someday I will write it.

Monday, June 10, 2013

008. ADD DATABASE TO JTABLE (JTABLE PART. 1)


I was having much trouble with JTable. Now, I still have it. How many parameters we need to change, when we change some columns. Because of its complicated, I try to build a simple library to decrease that trouble. And perhaps, we can use it...

Requirements:
- we have read 007. Register library, and download daniani.jar
- download derby.jar (database library), and register it to the project.
- download sample database (Java DB - Apache Derby 10.8.1.2). On GoogleDrive page, choose menu: File -> Download. This file contain database=DANIANI_DB; user=daniani_user; password=daniani_pwd; schema=SCH. Then extract it in a certain location.

Let's do it...
  • Create a new JFrame (001. THE BEGINNING)
  • Choose JTable component from Pallete, then drop it on our new frame.


  • Design it


  • Click jTable1 in Inspector tab then right click to rename = dtble


  • Set property autoResizeMode = OFF, and rowHeight=25


  • Switch to view Source code, then insert this script below initComponents():

       initComponents();
        try{
            Connection dCon=null;
            Class.forName("org.apache.derby.jdbc.EmbeddedDriver");
            dCon = DriverManager.getConnection("jdbc:derby:"
                    + "yourDBfolderLocation/DANIANI_DB"
                    + ";user=daniani_user;password=daniani_pwd");

            Table dtble = new Table();
            dtble.initColumn();

            dtble.addColumn("PRT.IDPARENT","idparent", false, "text", 70, "");
            dtble.addColumn("PRT.DINT","dint", false, "number", 50, "");
            dtble.addColumn("PRT.DVARCHAR","dvarchar", false, "text", 120, "");
            dtble.addColumn("PRT.DBOOLEAN","dboolean", true, "yesno", 90, false);
            dtble.addColumn("PRT.DDECIMAL","decimal", true, "numberBD2", 50, "");
            dtble.addColumn("PRT.DDATE","date", false, "date", 100, "");
            dtble.addColumn("PRT.DTIMESTAMP","timestamp", false, "timestamp", 150, "");
            dtble.addColumn("PRT.DCOLOR","color", false, "color", 80, "");

            String sqlFrom="FROM SCH.PARENT PRT";

            dtble.buildTable(tbl, false, sqlFrom, dCon, false);

            //- render
            tbl.setDefaultRenderer(Color.class, new daniani.ColorRenderer(true)); //to view color
            dtble.cellFormatNumber(2, new String[]{"decimal"}); // to view fraction by 2 scale
            dtble.cellAlignment(SwingConstants.CENTER,
                    new String[]{"idparent", "date", "timestamp"}); // center alignment

        } catch(Exception cnfe){
            System.out.println(cnfe);
        }

This should be work.

NOTE:
If the database connection is failure, try to delete file db.lck in .../DANIANI_DB folder.

REFFERENCE (case-sensitive)

Syntax:
daniani.Table.addColumn(String FieldName, String ColumnName, boolean isEditableCell, String ColumnClass, String ColumnFormat, int ColumnWidth, Object DefaultValue);


Column Format

text store String datatype

date view Date datatype in dd-MM-yyyy

dateYMD view Date datatype in yyyy-MM-dd

dateMDY view Date datatype in MM-dd-yyyy

date;ff view Date datatype in custom date-formatted,
ex.: date;dd-yyyy-MM

time view Time datatype in HH:mm:ss

timestamp view Timestamp datatype in dd-MM-yyyy HH:mm:ss

timestampYMD view Timestamp datatype in yyyy-MM-dd HH:mm:ss

timestampMDY view Timestamp datatype in MM-dd-yyyy HH:mm:ss

timestamp;ff view Timestamp datatype in custom timestamp-formatted,
ex.: timestamp;dd-yyyy-MM HH:mm:ss

yesno cell with checklist view

number store Integer datatype

numberF store Float datatype

numberD store Double datatype

numberBD store BigDecimal datatype

numberBD0 store BigDecimal datatype with 0 scale when edited.

numberBD2 store BigDecimal datatype with 2 scale when edited.

numberBD;n store BigDecimal datatype with n scale when edited,
ex.: numberBD;4   -> store BigDecimal datatype with 4 scale when edited.

color view cell in a certain color

Syntax:
daniani.Table.buildTable(JTable jtableComponent, boolean isAllowAddNewRow, String FromSQLClause, java.sql.Connection ConnectionName, boolean isHitEnterKeyToRightDirection);
Saturday, May 11, 2013

007. REGISTER LIBRARY(JAR) TO NETBEANS OR PROJECT


  • Download daniani.jar (top-right this blog/ Reference (Downloads))
(for sample library)
  • Open Netbeans IDE

  • Add Library to Netbeans
    • Click menu, Tools -> Libraries
    • Click button, New Library...
    • Set Library Name, for example: daniani. Click OK.
    • A new library (daniani) will be shown. On selected library, click Add Jar/Folder... button.
    • Search daniani.jar that we have downloaded, click Add Jar/Folder.
    • The library location will be add to Library Classpath. Click OK.

    Add Library to Project
    • Choose a project
    • Expand the tree, then right click Libraries node, choose Add Library...
    • Choose the library that we have created (for example: daniani). Click Add Library.
    • So, daniani will be added to Libraries node.
    • If needed, add some other libraries to a project

    Using Library (sample)
    • Create new JFrame Frame..., and named=LibraryTest (we asume that we have read and understood 001. THE BEGINNING)


    • Add JButton, then compose it to follow design below
    • Right click JButton, choose: Events -> Action -> actionPerformed
    • Type the script (for the action):
      dnMessageDialog md = new dnMessageDialog("This is a content", "Title", 0);
      md=null;


      And we must: import daniani.control.dnMessageDialog;

      (I created a custom dnMessageDialog, to get a truly Always on Top and able to copy a message such as an error message).

    • Run this file, by pressing Shift+F6, or right click on LibraryTest, choose Run File.
    • I hope working.